Painting Wood Plank Bases
Red Stick Studio Blog Published 07/12/10
This takes off from the other day’s post, “Creating Wood Plank Bases”. This is the way I ended up doing these bases, but really, if you want them different shades, it’s ultimately up to you, the painter, how they are done, and most importantly, that you are happy with the end result.
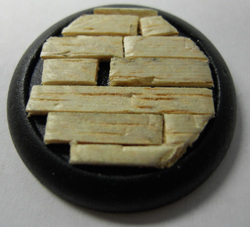
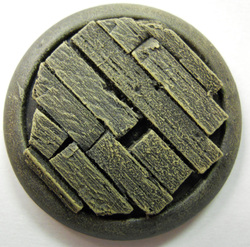
As a reminder, this is the base we are starting with today
This takes off from the other day’s post, “Creating Wood Plank Bases”. This is the way I ended up doing these bases, but really, if you want them different shades, it’s ultimately up to you, the painter, how they are done, and most importantly, that you are happy with the end result.
As a reminder, this is the base we are starting with today
Tools/Paints needed
Your usual painting supplies.
A good drybrush, and for this project, a flat brush is ideal.
P3 Thalmar Black
P3 Umbral Umber
P3 Bootstrap Leather
P3 ‘Jack Bone
P3 Menoth White Highlight
GW Dark Angels Green
White
Painting the Base
Step 1
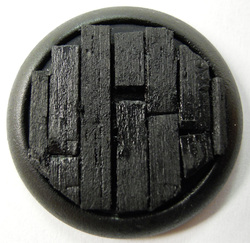
Prime the base black. This can be either a brush primer, or spray prime. If you choose to spray prime expect to need to go back over it with a thinned down coat of black to get into the deep crevices.
Your usual painting supplies.
A good drybrush, and for this project, a flat brush is ideal.
P3 Thalmar Black
P3 Umbral Umber
P3 Bootstrap Leather
P3 ‘Jack Bone
P3 Menoth White Highlight
GW Dark Angels Green
White
Painting the Base
Step 1
Prime the base black. This can be either a brush primer, or spray prime. If you choose to spray prime expect to need to go back over it with a thinned down coat of black to get into the deep crevices.
Step 2
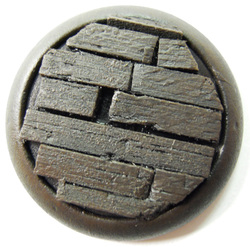
Drybrush the base with Umbral Umber. At this point you won’t notice much, even in the image, but it’s important to build up from a good dark brown.
Drybrush the base with Umbral Umber. At this point you won’t notice much, even in the image, but it’s important to build up from a good dark brown.
Step 3
Drybrush the base with Bootstrap Leather. It’s also important to note, don’t try to clean out your brush during this, at all. The subtle mix of each of the colors will help give you the wood grain look, and it will give each base a slightly unique look, but keeping it uniform as well.
Drybrush the base with Bootstrap Leather. It’s also important to note, don’t try to clean out your brush during this, at all. The subtle mix of each of the colors will help give you the wood grain look, and it will give each base a slightly unique look, but keeping it uniform as well.
Step 4
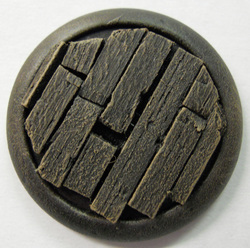
Light drybrush of ‘Jack Bone. Concentrate more on the plank edges and a light dusting to the wood itself. You don’t want to hide the previous colors you’ve drybrushed onto the base at this point with this color.
Light drybrush of ‘Jack Bone. Concentrate more on the plank edges and a light dusting to the wood itself. You don’t want to hide the previous colors you’ve drybrushed onto the base at this point with this color.
Step 5
Highlight the very edge with ‘Jack Bone/Menoth White highlight 50/50 mix, making sure you only get the actual edges, and where the boards end. This gives you a bit of wear in the appropriate places.
Highlight the very edge with ‘Jack Bone/Menoth White highlight 50/50 mix, making sure you only get the actual edges, and where the boards end. This gives you a bit of wear in the appropriate places.
Step 6
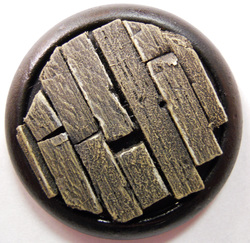
Now that you’ve completed the planks, it’s time to do the rim of the base. Thinned Thalmar Black will accomplish this, painted carefully around the base, missing the planks entirely.
Step 7
Once this has dried, then paint on your arc markings, preferably with a template to guide you, if this is applicable. For this mini, it is, as it’s the base for Pirate Queen Skarre, Privateer Press Warmachine Cryx Faction Warcaster.
Step 8
If you’re coloring the arc, now’s the time to get it done. This one is done with Dark Angels Green for the front arc of the mini.
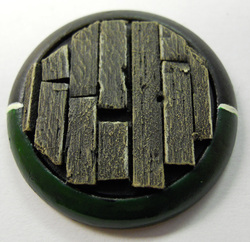
And… You’re done!
Finished Base
Now that you’ve completed the planks, it’s time to do the rim of the base. Thinned Thalmar Black will accomplish this, painted carefully around the base, missing the planks entirely.
Step 7
Once this has dried, then paint on your arc markings, preferably with a template to guide you, if this is applicable. For this mini, it is, as it’s the base for Pirate Queen Skarre, Privateer Press Warmachine Cryx Faction Warcaster.
Step 8
If you’re coloring the arc, now’s the time to get it done. This one is done with Dark Angels Green for the front arc of the mini.
And… You’re done!
Finished Base
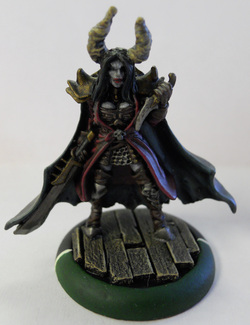
Finished Base, with miniature.
As always, guide and all images copyright Red Stick Studio.
